Monday, February 17, 2014

Thursday, February 13, 2014

Assignment 1


Section1 – Word Processor

Think back to a lesson you observed during your prac teaching.
            Create a worksheet you could have used for that lesson
            It must contain
               Grade and Learning Area/Subject
               a clear, appropriate font
           At least some of:
               some graphic element – pictures, call outs, shapes, etc
               tick box, numbers or tables
               lines to write on
 
Section 2 – Word processor or Spreadsheet
Create an assessment RUBRIC or CHECKLIST in Word or Excel
It should assess whatever lesson you selected for Section 1
It could be a test, a process or progress checklist, a rubric for a task, etc
It must contain a table which needs to incorporate borders and shading
If you choose to prepare a test, use lines, numbering and some graphic element eg a graph, labels, etc


Section 3 - Spreadsheet

Do the markbook exercise that I will e-mail to you as soon as I have your correct e-mail


Due Dates


Worksheet, Rubric/checklist and Spreadsheet Exercise - 3 March 2014

Create a folder for this work and label it with YOUR NAME, SURNAME and STUDENT NUMBER

ZIP the folder and email it to pgceukzn2014@gmail.com


Using Office for Administration - Spreadsheets


MS EXCEL

Excel is a spreadsheet programme which allows CALCULATIONS to be made. It is hugely useful for a variety of different applications in teaching, including the dreaded Mark Sheets which most teachers need to do at some stage or another.

However, that is not all Excel can be used for - here are a few other ideas for using them in the classroom:
Use the cells to design a SEATING PLAN of the kids in your class - and you can even use the REVIEW menu to add comments about what to look out for - "He talks too much" "She will burst into tears if you raise your Voice" etc.


Create a CLASS LIST. You can sort Alphabetically using the SORT tool - but don't forget to EXPAND THE SELECTION if you select only one column at the beginning


Draw Graphs or Charts to show data graphically. The Chart Icon allows you to turn your data into a chart. You can choose a variety of different types of graphs. You can even make PICTOGRAPHS

Make a MARK BOOK

You have detailed instructions on how to create a Mark Book in your assignment. Some of the skills you will need to master are:

  • Renaming the  spreadsheet

  • Sorting class lists alphabetically


  • Orientating Headings

  • Calculating the SUM of a range of numbers
  • Calculating the AVERAGE of a range of numbers

Remember when you perform a calculation that there are some rules that you need to follow

eg

  • Changing data
  • Saving and retrieving the markbook 

  • Monday, February 10, 2014

    Using Office for Administration - Word Processor

    The Microsoft Office - and other shareware Office packages - are "lifesavers" for teachers to use. They give you an opportunity not only to make your Admin  work neat, but also to re-use them in other terms and years. The best part, is that you can make changes on a regular basis.
     
    Here is a list of some of the things you can use WORD for

    Creating worksheets
    • Setting test and exam papers
    • Developing assessment rubrics
    • Writing good news or disciplinary notes
    • Weekly lesson plan
    • Creating certificates
    • Designing concert programme
    • Publishing sport team lists
    • Writing letters to parents or sponsors
    • Drawing diagrams using lines and shapes
    • Creating newsletters
    • Writing and editing essays / reports
    • Completing learner support templates
    • Writing CVs
     
    We will look at a few of these applications in this course.

    Worksheets

    Use text boxes, tables and call outs to make the worksheet interesting.

    Make sure that the text is large enough to read.

    A clear, clean font makes the worksheet easier to read – even for senior grades
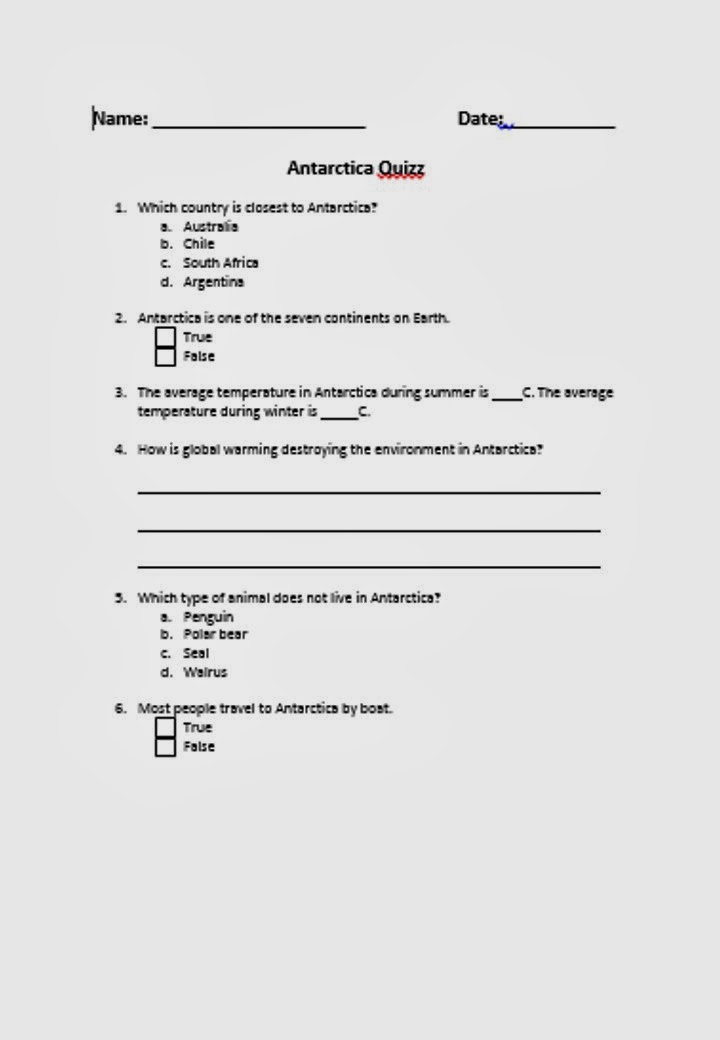
    
     
    Tests and Exams

    Remember when you are testing learners, the test should be on the content they have learnt and the skills they use in applying the content NOT their ability to read a poorly designed test with untidy and difficult to read writing and confusing questions.
     Make sure the SPACING between lines is at least 1.5 - this makes scanning and close reading easier.
     Use a reasonable font size - a minimum of 12, and up to 16 for younger learners.  I generally use Calibri 14 as this is easy to read.
     The Layout of the test can help learners follow instructions.
     Tick boxes are useful for True/False questions
     Use Google Forms (find them on Google Drive) OR make your own tick boxes using INSERT - SHAPES
      
     Numbers for multiple choice questions can be inserted from the HOME menu
     
    Lines for writing extended answers are important if learners are to work on the question paper - don't just leave a space
     
    Tables with blocks to fill in are really useful if only a small amount of text is wanted. 
     
    Assessment Rubrics
     
    Tables
    These make it really easy to see what is going on. You can insert a table from  the INSERT menu - select how many columns and rows you need.


    Merge Cells
    This allows you to make clear headings for sections of the rubric, or it allows you to make a clear line between sections
    Highlight the cells you want to merge and MERGE CELLS

    You can also SPLIT a cell into more lines or columns

    Borders and Shading
    This makes assessment sheets clear and easy to follow.
    Use the Borders and Shading tool to make clear divisions between types of information in the rubric


    Smiley Faces or other graphics
    In the Foundation Phase you may want to use "smiley faces" to help the learners understand what you are looking for.
    One place you can find a smiley face icon is in the BASIC SHAPES menu in the INSERT toolbar.
    You can even change the shape of the mouth by "pulling" on the diamond on the mouth
    

    Welcome!

    For all you early birds who have signed in - welcome to PGCE 2014.

    This blog will contain all the course notes for this learning technologies course, as well as links to interesting articles and tools.

    Please use the notes below to help you comment on the Blog.

    POST A COMMENT

    Please leave a comment on our posts!! It is very encouraging for us. Leaving a comment is as simple as this…

    1. Scroll down to the bottom of the post you wish to comment on until you see the word ‘Comments’

    2. Click on the word ‘Comments’ and a ‘Post a Comment’ section will open.

    3. You can choose the profile of ‘Anonymous’ if you are not a Google user but please add your name when you comment.

    4. When you are ready to submit your comment, click on ‘Post comment’.


    Thank you!